How to Create a PDF Document
When you need to create a PDF document, you can use the following step-by-step instruction that explains how to do that. Also on this website you will find information on advanced features of the PDF document format and a video demonstrating the process of creating a PDF file.
Video Instruction: Creating a PDF File
In addition to the instruction, you can watch this video that demonstrates the process of creating an Adobe PDF document using a documentation tool. The video shows you how to create a Table of Contents, write content, add an Index page, and, finally, how to get a PDF file from a topic-based documentation project. You can download a tool that you can use to create your own PDF files by clicking here.
1.) Download a PDF Tool
To create a PDF file, you need to download a documentation tool, or a specialized PDF file creator. Using the button below, you can download a tool that allows you to create PDF files from a topic-based source project, and also supports some advanced features of the PDF format such as compression, encryption capabilities, and font-embedding options, which is important for displaying the resulting file on different platforms.
To install the PDF creator:
Download the PDF creation tool by clicking the "Download" button, then open the setup file, and follow the instructions of the setup program.
2.) Create the Structure of Your PDF Document
After the successful installation of the PDF creation tool, you can start a new project: on the File tab, click New.
Then you can start adding topics and sub-topics into the project manager. Thus, on this step, you can create the structure of topics that will be available on the "Bookmarks" tab when viewing your PDF file in Adobe Reader.
To add a topic or sub-topic into your project:
- On the Project tab, in the Topics group, click Add.
- In the dialog box, enter a Title of the new topic.
- Click OK.
Remark: By default, when you click the Add button on the toolbar, the new topic will be added on the same level as the item you have selected in the Project Manager pane. If you need to add a child topic into the selected item, you should click "Add child TOC Item" on the popup menu available below the same "Add" button.


3.) Write Content for Topics
You can write content of your PDF file by editing individual topics. To open a topic for editing, simply click on it in the Table of Contents. When writing content in the built-in word processor, you can use any elements such as images, tables, hyperlinks, bookmarks, and so on.
Below are examples of how you can insert an object into the topic content.
To insert an image:
- On the Insert tab, in the Media group, click Picture.
- Then find an image file on the disk, and click Open.
To insert a hyperlink:
- On the Insert tab, in the Links group, click Hyperlink.
- In the dialog window, select a hyperlink type, enter hyperlink text, and then click OK.
Remark: In a PDF document, you can insert hyperlinks to other topics within the same document (including links to a bookmark to add auto-scroll to a specific page), and also you can insert a hyperlink linking to an external web page.
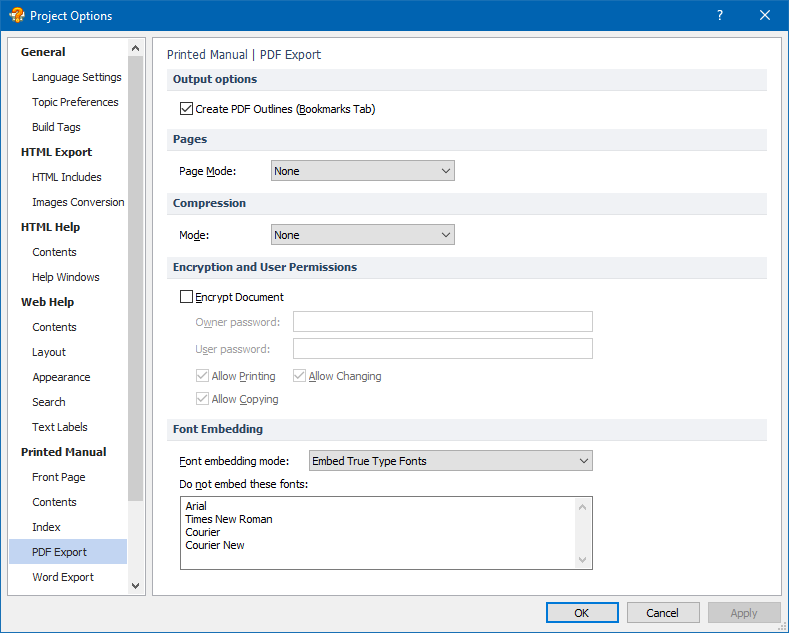
4.) Setup PDF Options
To edit options of the PDF document that you are creating:
- Click the Project tab.
- In the Project group, click Project Options.
- In the General section, you can setup main settings such as the Title, and Copyright. Also, in the "Printed Manual->PDF Export" section, you can setup special PDF features such as Page Layout, Compression Mode, Encryption and Password Protection, and Font Embedding options as well.

5.) Create the PDF File
Finally, you can create your PDF document by compiling the source project into a single file with the .PDF extension.
To compile your project into a PDF document:
- On the Project tab, click Compile.
- In the dialog window, in the Output format box, select "PDF Document".
- Click OK.
Distribution of the PDF File
After the compilation is finished, the tool you are using to create your PDF file will open the document in Adobe Reader. By default, the file will be placed into the same folder in which you have saved your project file. Alternatively, you can change the output directory by editing the options as described on the Step 4.
A PDF document you have created is stored in a stand-alone file, which means that the PDF file stores all the information including content, images, topic structure, and other data needed for Adobe Reader to display the document. Thus, this is the only file that you need in order to distribute the document to other people.
2 Comments